Advertisement

Support
Configuring Apple Email Client on macOS for Philippines Online Service
Follow the Step-by-Step guide below to setup PhilOnline Email account.
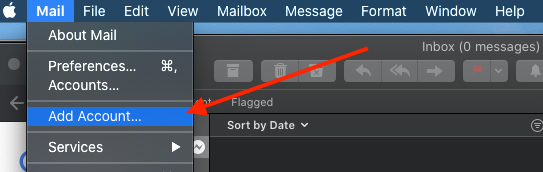
Open Apple Mail.
Click on Mail > Account.
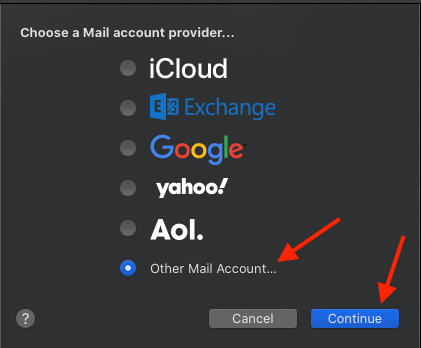
Click on the Other Mail Account and then "Continue".
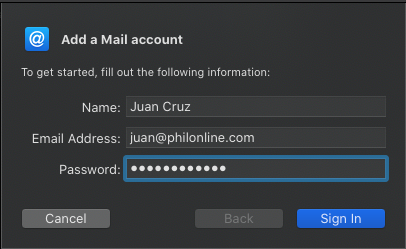
Enter your Name and Philippines Online assigned email address (note this must include @philonline.com). Click on "Sign in".
The email client will attempt to connect directly to "philonline.com" which will fail. A window will appear which will allow you to encode the correct server profiles of the service.
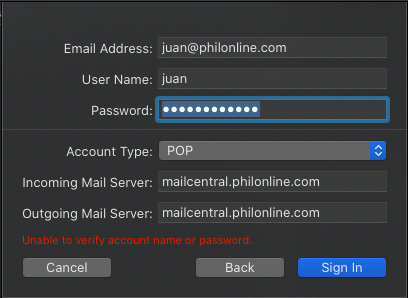
On this screen enter the following:
Email Address - you will have the option to change the default email address to your custom email address hosted with Philonline e.g. juan@somedomain.com or an alias. If none just type in the same email address as in Step 4.
User Name and Password - type in the username only (ie without the @philonline.com) and your mailbox password.
Account Type - if you wish to download your email without leaving a copy on the server, choose "POP" if not, you can choose "IMAP".
Incoming and Outgoing Mail Server - enter "mailcentral.philonline.com".
Click on "Sign In". By default the Apple Mail client will try to connect to our servers using the most secure method. Due to issues with some email clients, we only use basic authentication. If you see this error:

Just click on "Continue". Your account should be set up after this step.